This aims to be a list of actual AppStore rejection criteria based on our, and hopefully your, direct experience. Please add to this compendium by leaving your own rejection reasons in the comments and we’ll add them to the main list on a daily basis.
1) Vibration. It is not permitted to use continuous vibration in your apps – short bursts as warnings is all that is allowed. Don’t bother trying to set up a timer to keep the vibration going, it will cause your app to be rejected.
2) Linking to private frameworks. This is obvious, but somehow in playing around with stuff we had linked to the MoviePlayer.framework. That’s a no-no, and cost us about ten days while we unlinked that framework, recompiled, and then resubmitted.
3) Improper handling of editing in tableview cells. Also obvious, but be aware that if you enable table cell editing, you’ll have to manually specify which cells should respond to editing controls and which should not. We had some random prefs cells in one of our early apps that were able to be swiped to bring up a ‘delete’ badge. Of course it didn’t do anything, but Apple justly considered this poor design and rejected our app.
4) Icons. Make sure the 57 pixel icon is identical to the 512 pixel version. Also, use a different icon if you are creating ‘lite’ and ‘pro’ versions of your app (i.e., free and paid). Using the same icon for both sends your app straight to … you guessed it … teh bin.
5) Flatulence. Don’t even try. ’nuff said. Now Allowed! Hallelujah!
6) Copying existing functionality. This one is much more subtle and insidious, and has probably affected the great percentage of developers. In addition to the widely publicized Podcaster debacle, reports from user comments indicate that Apple is casting a wide net when looking for duplicated functionality. Mini web browsers, or apps that essentially show web pages, seem particularly vulnerable, even if they add new and/or useful functionality. Stay away from email clients as well.
7) Using appropriate keyboard type. If your app asks for a phone number or other numeral-only input and you present a keyboard that also includes the possibility of entering standard alpha-numeric input … yep. (Thanks Jeremy1026)
Version numbers. If your app is currently at version 0.99 or below, you’d better consider giving it a promotion as Apple seems to prefer 1.0 and above. One of ours was recently rejected for being .016, with a message suggesting that our version number wasn’t even numeric. When we resubmitted the same app from scratch as version 1.0, it went through.
9) Using Apple’s graphics in your own apps. Since Apple did such a tremendous job on the UI for the iPhone, it is awfully tempting to use their graphics and/or style in your own apps. Resist the temptation: we’ve heard of projects being rejected for using the Bonjour logo, as well as Apple’s network icon (the little picture of the globe with all the glowing lines), and others. Even if you use Apple’s button images you may tempt fate if you use them in any way that is at odds with how Apple uses them. For instance, the blue button with the “+” sign can ONLY be used to add a contact to a list – don’t try to use it for anything else.
10) Tableviews again. Victor Wang is REALLY picky about tableviews. If you let a user highlight a row in order to select something or initiate an action, you’d better make darn sure that row is DEselected by the time the tableview is displayed again. Want to keep that row selected as a ‘feature’ (perhaps to remind the user which item they last selected)? Not if you want your app to be approved by Apple, you don’t!
11) Network reachability. If your app uses a network connection, it is YOUR responsibility to tell the user if and when their device loses its network connection. In a recent appstore rejection screenshot, the Apple tester had clearly turned on Airplane mode, then launched the app. When the tester was only informed that the app could not log in, but not that the reason for the login failure was because of the lack of a network connection, the app was rejected.
12) Offensive language from your users. If your app has an interactive component that lets users post text, or if your app pulls user-generated content from the internet, it is YOUR responsibility to censor the language – otherwise Apple will censor your app right out of THEIR store. In a recent report, the Apple tester had written ‘F**K’ into a chat window, and then immediately disqualified the app for obscene language.
12) Use of private APIs. If it isn’t in the iPhone SDK documentation, you can’t use it. This is particularly frustrating for OS X developers moving code over to the iPhone because a lot of functions do work fine and you don’t even suspect that they could be off-limits for the iPhone. Nevertheless, here are some of those calls you might want to make sure are not in your codebase:
currentHost
descriptionWithCalendarFormat:timeZone:locale:
removeFileAtPath:handler:
setNumberOfRows:
terminate
Friday, July 22, 2011
Thursday, July 7, 2011
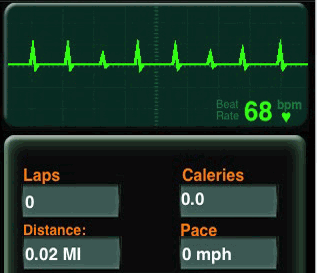
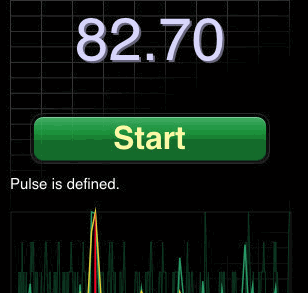
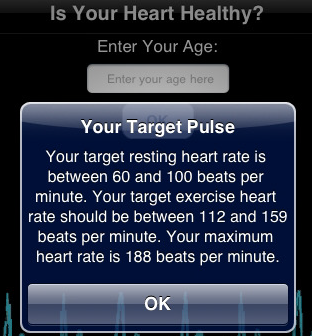
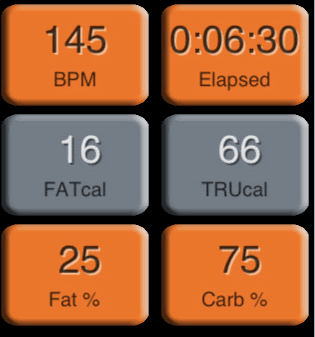
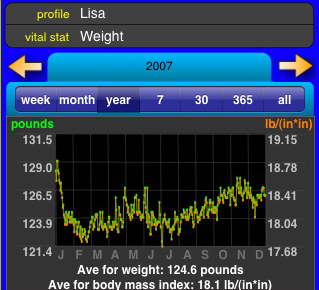
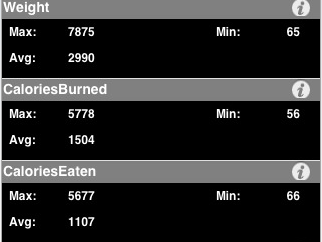
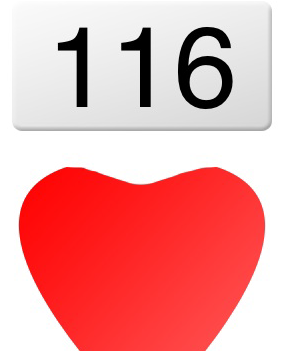
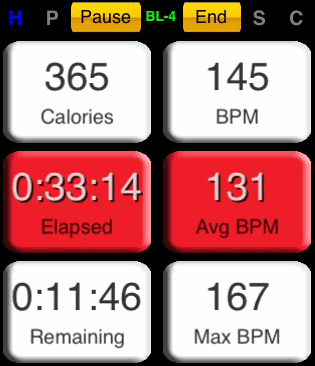
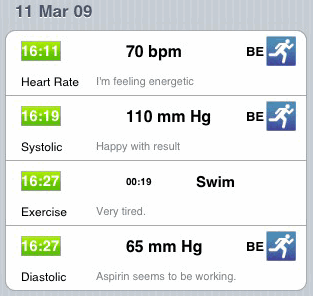
23 Top Heart Rate Monitors for iPhone
iPhone is unlike any other smart phone. Not only it lets you make phone calls and have a lot of fun with the apps available on iTunes, you can also use it to become more healthy and even lose weight. There are lots of cool applications to choose from in the health and fitness categories. Take heart rate monitors. You can not only track/monitor your heart rate with these apps but also how much you are burning on an everyday basis. A great way to get on the right track and stay on it.
Here are the 23 best heart rate monitor apps for iPhone:
iRunXtreme: iRunXtreme is a highly sophisticated application that lets you monitor your heart rate using your iPhone microphone. As easy as that!
Fitview: Fitview is a complete tracking application for every aspect of your health. You can track your body sugar, heart rate, and … Very useful for the methodical types among us.
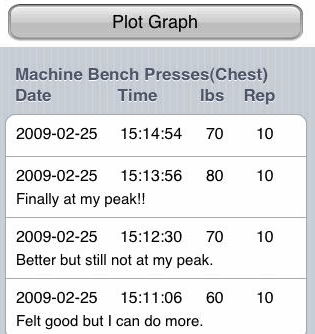
FitnessBuilder: FitnessBuilder is perhaps the only application you need to get yourself in shape. It’s a complete guide (w/ videos) to take your workout to the next level. Allows you to track your HR and calories burned as well.
12 Fitness Calculators: 12 Fitness Calculators provides you with everything you need to keep track of your progress when it comes to fitness and weight loss.
Heart Rate Monitor: HRM is another cool iPhone app that monitors your heart beat by using your iPhone’s microphone.
iHeart: iHeart is a pulse reader that lets you figure out your pulse rate by holding your iPhone in your hands. Can’t get any easier than this. Not too shabby.
iPulse: iPulse is a decent heart rate monitor that not only counts your heart rate but also comes with a log system to help you keep track of your activities.
iNewLeaf: a sophisticated app that helps you keep track of your workout and track your progress easily. You can also keep track of how many calories you are burning and how much fat you are carrying. Good choice for those who live an active lifestyle.
Vitalsview: whether you want to track your body fat, your heart rate or blood pressure, you can do it all with Vitalsview.
Gym Tracker: a wonderful utility application for every gym addict. It lets you keep track of your heart rate, exercises, and all other relevant information. It can also help you take your workout to the next level.

iHeartRate Monitor: iHeartRate makes it easy to track your heart rate. All you have to do is tap on your iPhone.
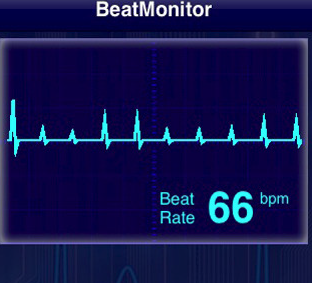
BeatMonitor: another decent app that uses your iPhone’s microphone to track your heart rate.

Gym Bio: Gym Bio is a useful application for those who go to the gym on a consistent basis. Helps you track your workoutts and get more out of them.
Hcalc: Hcalc makes it easy to track your heart rate and target a specific range for your workouts.

Hrate: Hrate is a simple ap that uses your heart rate information to come up with your zones.
Aerobic View: Aerobic View is a cool little app that lets you get more out of your aerobic workouts.

myCheckUp: myCheckUp is a cool health application for iPhone that lets you prepare and track your checkup data for the next time you are going to visit a doctor. Track your heart rate, your weight, and more with myCheckUp.
Fitness Calculator: Fitness Calculator is a complete health calculator to cover all your needs.
MyWorkOut: MyWorkOut is another simple application that lets you store and track your health information.
RPM – Heart Rate Calculator: RPM is a simple app that gives you your heart rate with your taps.
iBPM+ – Heart Rate Monitor: a complete dashboard for all your fitness stats. Your heart rate, calories burned, heart rate zones, and …. are all provided to you in iBPM+.
Heart Log: Heart Log is a simple logging application designed for anyone who has heart issues or wants to keep track of her heart rate on an everyday basis. Simple but gets the job done.
Absolute Fitness: if you are planning to take better care of your heart and what you take in, you should use Absolute Fitness to track your heart rate, calorie in-take, and your overall progress towards a more healthy life.
There you have it. If you are looking to track your heart rate on your iPhone, you won’t go wrong with the above apps. Best of all, most of these apps are cheap too! Don’t forget to suggest your favorite apps.
Here are the 23 best heart rate monitor apps for iPhone:
iRunXtreme: iRunXtreme is a highly sophisticated application that lets you monitor your heart rate using your iPhone microphone. As easy as that!
Fitview: Fitview is a complete tracking application for every aspect of your health. You can track your body sugar, heart rate, and … Very useful for the methodical types among us.
FitnessBuilder: FitnessBuilder is perhaps the only application you need to get yourself in shape. It’s a complete guide (w/ videos) to take your workout to the next level. Allows you to track your HR and calories burned as well.
12 Fitness Calculators: 12 Fitness Calculators provides you with everything you need to keep track of your progress when it comes to fitness and weight loss.
Heart Rate Monitor: HRM is another cool iPhone app that monitors your heart beat by using your iPhone’s microphone.
iHeart: iHeart is a pulse reader that lets you figure out your pulse rate by holding your iPhone in your hands. Can’t get any easier than this. Not too shabby.
iPulse: iPulse is a decent heart rate monitor that not only counts your heart rate but also comes with a log system to help you keep track of your activities.
iNewLeaf: a sophisticated app that helps you keep track of your workout and track your progress easily. You can also keep track of how many calories you are burning and how much fat you are carrying. Good choice for those who live an active lifestyle.
Vitalsview: whether you want to track your body fat, your heart rate or blood pressure, you can do it all with Vitalsview.
Gym Tracker: a wonderful utility application for every gym addict. It lets you keep track of your heart rate, exercises, and all other relevant information. It can also help you take your workout to the next level.
iHeartRate Monitor: iHeartRate makes it easy to track your heart rate. All you have to do is tap on your iPhone.
BeatMonitor: another decent app that uses your iPhone’s microphone to track your heart rate.
Gym Bio: Gym Bio is a useful application for those who go to the gym on a consistent basis. Helps you track your workoutts and get more out of them.
Hcalc: Hcalc makes it easy to track your heart rate and target a specific range for your workouts.
Hrate: Hrate is a simple ap that uses your heart rate information to come up with your zones.
Aerobic View: Aerobic View is a cool little app that lets you get more out of your aerobic workouts.
myCheckUp: myCheckUp is a cool health application for iPhone that lets you prepare and track your checkup data for the next time you are going to visit a doctor. Track your heart rate, your weight, and more with myCheckUp.
Fitness Calculator: Fitness Calculator is a complete health calculator to cover all your needs.
MyWorkOut: MyWorkOut is another simple application that lets you store and track your health information.
RPM – Heart Rate Calculator: RPM is a simple app that gives you your heart rate with your taps.
iBPM+ – Heart Rate Monitor: a complete dashboard for all your fitness stats. Your heart rate, calories burned, heart rate zones, and …. are all provided to you in iBPM+.
Heart Log: Heart Log is a simple logging application designed for anyone who has heart issues or wants to keep track of her heart rate on an everyday basis. Simple but gets the job done.
Absolute Fitness: if you are planning to take better care of your heart and what you take in, you should use Absolute Fitness to track your heart rate, calorie in-take, and your overall progress towards a more healthy life.
There you have it. If you are looking to track your heart rate on your iPhone, you won’t go wrong with the above apps. Best of all, most of these apps are cheap too! Don’t forget to suggest your favorite apps.
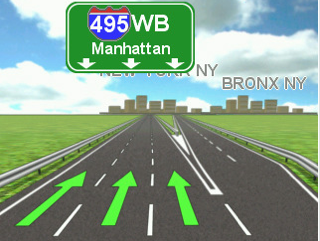
10 Best GPS Apps For iPhone
iPhone is quickly killing PNDs in the GPS market. While companies such as Garmin and TomTom struggle to make gains in the personal navigation market, more folks are taking advantage of iPhone to get directions and get to their destinations faster. iPhone GPS apps may not be the cheapest apps available on iTunes but the top ones do get the job done and can get you out of sticky situations time and time again. If you are planning on using your iPhone as a mobile GPS device, here are 10 cool GPS apps you should try:

1. MobileNavigator: Navigon’s official GPS application for iPhone. It’s one of the most powerful GPS apps ever made for iPhone. Provides you with everything you need to get on the road without any doubts. It gets updates on a consistent basis (supports multi-tasking now).
2. TomTom for iPhone: TomTom for iPhone has a lot of potential. TomTom has gone out of its way to bring its best features to iPhone. The new version is compatible with the latest version of iOS.

3. Magellan RoadMate: Magellan RoadMate offers text to speech, 3D buildings, lane assistance, and in app music control. You can also use it to navigate around your city when you are not in your car (pedestrian mode).

4. Mobile Maps America: Mobile Maps America turns your iPhone into a super GPS and provides you with turn by turn directions. The 3D maps are impressive and the directions are accurate. International versions are available too.

5. iGo My Way: iGo My Way is one of the elite GPS apps for iPhone. Great 3D graphics, and you won’t have to pay a monthly fee to take advantage of it. European and other versions are available as well.

6. G-Map U.S. East: G-Map U.S. East is a cool GPS solution for iPhone that helps you get directions and navigate your way through your city without too much trouble. The maps looks as good as the ones on my Garmin GPS. Best of all, you only pay for regions you intend to visit. If you live in California and around that area, you should be using G-Map U.S. West.
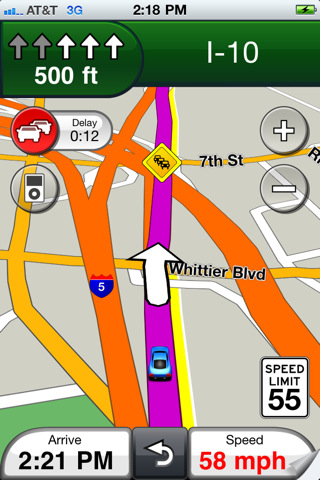
7. Garmin Streetpilot: Garmin’s first GPS application for iPhone. It offers text to speech, real time traffic updates, information on speed limits, local search and multi-tasking. Maps are on-demand though (at least for now).

8. CoPilot Live: CoPilot Live is more affordable than some of the other apps on this list. It does offer you 3D maps, turn by turn directions, multi-route navigation, and guidance in tunnels. Works with the latest iPhone too.
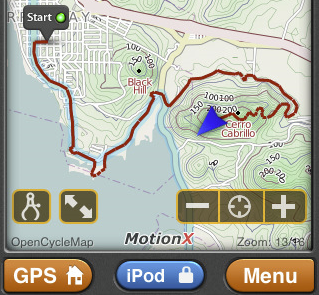
9. MotionX: MotionX is one of the best GPS app for iPhone. It also integrates Facebook as well. An excellent solution for biking, hiking, and outdoors in general. Has been topping the best seller charts for months.
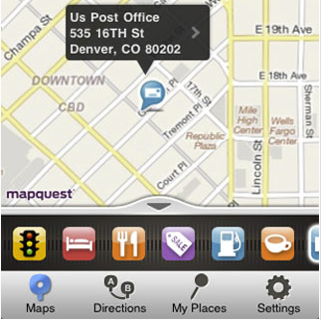
10. MapQuest 4 Mobile: MapQuest does not need any introduction. It’s a free navigation solution that provides you with directions and speaks them to you on the road. Find Me and Auto-Reroute features are nice to have too. If you don’t want to spend too much money on a GPS app, this is for you.
Who needs a standalone GPS device when you can use the above applications to find your way to your destination fast. If you are looking for apps to go beyond in-car navigation, you should check these out:
1. MobileNavigator: Navigon’s official GPS application for iPhone. It’s one of the most powerful GPS apps ever made for iPhone. Provides you with everything you need to get on the road without any doubts. It gets updates on a consistent basis (supports multi-tasking now).
2. TomTom for iPhone: TomTom for iPhone has a lot of potential. TomTom has gone out of its way to bring its best features to iPhone. The new version is compatible with the latest version of iOS.
3. Magellan RoadMate: Magellan RoadMate offers text to speech, 3D buildings, lane assistance, and in app music control. You can also use it to navigate around your city when you are not in your car (pedestrian mode).
4. Mobile Maps America: Mobile Maps America turns your iPhone into a super GPS and provides you with turn by turn directions. The 3D maps are impressive and the directions are accurate. International versions are available too.
5. iGo My Way: iGo My Way is one of the elite GPS apps for iPhone. Great 3D graphics, and you won’t have to pay a monthly fee to take advantage of it. European and other versions are available as well.
6. G-Map U.S. East: G-Map U.S. East is a cool GPS solution for iPhone that helps you get directions and navigate your way through your city without too much trouble. The maps looks as good as the ones on my Garmin GPS. Best of all, you only pay for regions you intend to visit. If you live in California and around that area, you should be using G-Map U.S. West.
7. Garmin Streetpilot: Garmin’s first GPS application for iPhone. It offers text to speech, real time traffic updates, information on speed limits, local search and multi-tasking. Maps are on-demand though (at least for now).
8. CoPilot Live: CoPilot Live is more affordable than some of the other apps on this list. It does offer you 3D maps, turn by turn directions, multi-route navigation, and guidance in tunnels. Works with the latest iPhone too.
9. MotionX: MotionX is one of the best GPS app for iPhone. It also integrates Facebook as well. An excellent solution for biking, hiking, and outdoors in general. Has been topping the best seller charts for months.
10. MapQuest 4 Mobile: MapQuest does not need any introduction. It’s a free navigation solution that provides you with directions and speaks them to you on the road. Find Me and Auto-Reroute features are nice to have too. If you don’t want to spend too much money on a GPS app, this is for you.
Who needs a standalone GPS device when you can use the above applications to find your way to your destination fast. If you are looking for apps to go beyond in-car navigation, you should check these out:
Sunday, July 3, 2011
ImageLoad from Server in iPhone
In this application we will see how to image fetch from the server and place it to the view. I will show you the easiest way for image fetch from server. So let see how it will work.
Step 1: Open the Xcode, Create a new project using Window base application. Give the application “imageLoad”.
Step 2: Xcode automatically creates the directory structure and adds essential frameworks to it. You can explore the directory structure to check out the content of the directory.
Step 3: We need to add one ViewController class in the project. So select the project -> New File -> Cocoa Touch ->ViewController class and give the class name “ImageLoadFromServer”.
Step 4: Open the ImageLoadAppDelegate.h file, we need to define ImageLoadFromServer class and create an instance of ImageLoadFromServer class. So make the following changes in the file.
#import
@class ImageLoadFromServer;
@interface ImageLoadAppDelegate : NSObject {
ImageLoadFromServer *imageLoadFromServer;
}
@property (nonatomic, retain) IBOutlet UIWindow *window;
@property (nonatomic, retain) IBOutlet ImageLoadFromServer *imageLoadFromServer;
@end
Step 5: Now make the following changes in the ImageLoadAppDelegate.m file.
#import "ImageLoadAppDelegate.h"
#import "ImageLoadFromServer.h"
@implementation ImageLoadAppDelegate
@synthesize window=_window;
@synthesize imageLoadFromServer;
- (BOOL)application:(UIApplication *)application didFinishLaunchingWithOptions:(NSDictionary *)launchOptions
{
imageLoadFromServer = [[ImageLoadFromServer alloc] init];
[_window addSubview:imageLoadFromServer.view];
[self.window makeKeyAndVisible];
return YES;
}
- (void)applicationWillResignActive:(UIApplication *)application
{
}
- (void)applicationDidEnterBackground:(UIApplication *)application
{
}
- (void)applicationWillEnterForeground:(UIApplication *)application
{
}
- (void)applicationDidBecomeActive:(UIApplication *)application
{
}
- (void)applicationWillTerminate:(UIApplication *)application
{
}
- (void)dealloc
{
[_window release];
[super dealloc];
}
@end
Step 6: Open the ImageLoadFromServer.h file and create an instance of UIImageView. So make the following changes in the file:
#import
@interface ImageLoadFromServer : UIViewController {
UIImageView *imageLoad;
}
@property (nonatomic, retain) IBOutlet UIImageView *imageLoad;
@end
Step 7: In the ImageLoadFromServer.m file make the following changes:
#import "ImageLoadFromServer.h"
@implementation ImageLoadFromServer
@synthesize imageLoad;
- (id)initWithNibName:(NSString *)nibNameOrNil bundle:(NSBundle *)nibBundleOrNil
{
self = [super initWithNibName:nibNameOrNil bundle:nibBundleOrNil];
if (self) {
}
return self;
}
- (void)dealloc
{
[imageLoad release];
[super dealloc];
}
- (void)didReceiveMemoryWarning
{
[super didReceiveMemoryWarning];
}
#pragma mark – View lifecycle
- (void)viewDidLoad
{
[super viewDidLoad];
NSURL *imageurl = [NSURL URLWithString:@"http://www.chakrainteractive.com/mob/ImageUpoad/pic2-2.png"];
NSData *imagedata = [[NSData alloc]initWithContentsOfURL:imageurl];
UIImage *image = [UIImage imageWithData: imagedata];
imageLoad = [[UIImageView alloc] initWithImage: image];
[self.view addSubview:imageLoad];
}
- (void)viewDidUnload
{
[super viewDidUnload];
}
- (BOOL)shouldAutorotateToInterfaceOrientation:(UIInterfaceOrientation)interfaceOrientation
{
return (interfaceOrientation == UIInterfaceOrientationPortrait);
}
@end
Step 8: Now compile and run the application in the Simulator.
You can Download SourceCode from here ImageLoad
10 Reasons to Switch from Windows to Mac OS
Here are the 10 reasons why you should switch from Windows to Mac OS.
1. Security
There is no need for anti-virus software for Mac. Think about this: anti-virus software is just like another virus in disguise. It makes your computer excruciatingly slow because it continuously runs many virus monitoring processes.
- It slows down your system even more and may also consume bandwidth by trying to update the virus database.
- What more? It can cost you a lot every year.
2. Easy to use
According to the facts, an average user using Windows spends more than 50 hours per year troubleshooting the computer and an average mac user does not spend more than 10 hours. It is just so easy, it lets you do so many things without any complications or consuming time. For example Mac OS X can be easily installed without deleting the content of hard drive. There are several other things that can be done easily. It is just ready to use out of the box.
3. No crashing
Mac does not crash as it is based on UNIX Operating System which is almost not prone to crash. Of course every computer is prone to crash but the crash rate for Mac is not that much compared to Windows.
4. Most of the software are available for Mac OS, whereas you will find only crap applications on PC with load of useless widgets or search bars. Windows is smothered with lot of demoware, adware and other junk. It can get pesky when word balloons burble out of windows activation, system tray and user account control.
5. Another outstanding feature is that it can be turned into an external firewire hard drive by pressing the “T Key” while booting. With this, tons of data can be moved with the help of firewire cable
6. Mac enables moving documents very easily. It reads the PC documents on external USB drive.
7. Mac is a hub for digital music and entertainment
Mac is not only pretty or attractive but is more functional too. iTunes has been installed on Mac that lets you play audio and organize it. iTunes is the best digital audio program. One can check out the podcasts and burn the discs. With iDVD, one can author digital content in various formats and high quality. There is iWeb for publishing digital media to internet. iMovie is also included with which movies can be directly imported from digital cameras through firewire interface or USB.
8. Apple’s store Genius Bar
The Apple store’s Genius Bar is mind blowing that offers free in-person technical support. Geniuses can do everything form reinstalling the OS to even replacing the broken keys.
9. Windows applications for Mac
Thousands of Windows applications compatible with Mac are available. There are around 18000 Mac compatible products available in the market. Thus, Mac can run Windows if it is really needed. There are Parallels desktop and VMware Fusion virtualization utilities for this. However, this is going to be a last resort.
10. Last but not the least, Apple is one of the best software companies of the world. It is innovative and enjoyable with applications like iLife creativity suite or industrial-strength tools like Final Cut Pro.
Subscribe to:
Posts (Atom)