Monday, November 15, 2010

Simple Table View


In this tutorial will learn how to use Table View and also hoe to add object to table view, to insert the object into the table view we have to take an array and through that will add or insert the object into the Table View. 

 Simple Table View

In this tutorial will learn how to use Table View and also hoe to add object to table view, to insert the object into the table view we have to take an array and through that will add or insert the object into the Table View. After that will set the title name for the navigation controller which is used to display the title of the table view, then will set the number of rows and the component into the Table View.
Final view will look like this:
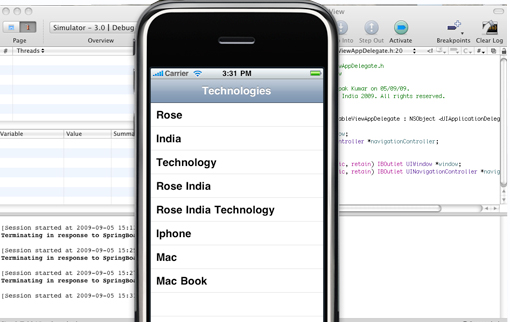
Before starting will tell you why we are using the Navigation Based Application, this is chosen because the title of that Table should be displayed.

My Project name is SimpleTableView and is Based on Navigation Application so it will show you Navigation bar on view so there is no need to add any navigation controller into the application because it already exist.As we know that in Navigation Based application will have RootViewController file and will add our code to that file.First will declare an array into the .h file.

RootViewController.h file will look like this:

@interface RootViewController : UITableViewController {
    NSMutableArray *mobject;
}
@end
Now that we declared Array into .h file will initialize and add object into - (void)viewDidLoad method and also will set the title for the Navigation.
mobject = [[NSMutableArray alloc] init];
    //Add items
    [mobject addObject:@"Rose"];
    [mobject addObject:@"India"];
    [mobject addObject:@"Technology"];
    [mobject addObject:@"Rose India"];
    [mobject addObject:@"Rose India Technology"];
    [mobject addObject:@"Iphone"];
    [mobject addObject:@"Mac"];
    [mobject addObject:@"Mac Book"];
    //Set the title
    self.navigationItem.title = @"Technologies";
Will set Number of rows into the Table View or Customize the Number of rows in the table view
- (NSInteger)tableView:(UITableView *)tableView numberOfRowsInSection:(NSInteger)section {
    return [mobject count];
}
Now that Table view Knows how many rows to be set into Table, will display the actual text which prints in a table view cell. The table View is made of rows and rows contain cells, will set up the cell value into the table by the following code.
// Customize the appearance of table view cells.
- (UITableViewCell *)tableView:(UITableView *)tableView cellForRowAtIndexPath:(NSIndexPath *)indexPath {
   static NSString *CellIdentifier = @"Cell";
    UITableViewCell *cell = [tableView dequeueReusableCellWithIdentifier:CellIdentifier];
    if (cell == nil) {
        cell = [[[UITableViewCell alloc] initWithFrame:CGRectZero reuseIdentifier:CellIdentifier] autorelease];
    }
    NSString *cellValue = [mobject objectAtIndex:indexPath.row];
    cell.textLabel.text = cellValue;
    return cell;
}
RootViewController.h file will look like this:
#import "RootViewController.h"
#import "SimpleTableViewAppDelegate.h"
@implementation RootViewController
- (void)viewDidLoad {
    [super viewDidLoad];
    //Initialize the array.
    mobject = [[NSMutableArray alloc] init];
    //Add items
    [mobject addObject:@"Rose"];
    [mobject addObject:@"India"];
    [mobject addObject:@"Technology"];
    [mobject addObject:@"Rose India"];
    [mobject addObject:@"Rose India Technology"];
    [mobject addObject:@"Iphone"];
    [mobject addObject:@"Mac"];
    [mobject addObject:@"Mac Book"];
    //Set the title
    self.navigationItem.title = @"Technologies";
}
- (void)didReceiveMemoryWarning {
    [super didReceiveMemoryWarning]; // Releases the view if it doesn't have a superview
    // Release anything that's not essential, such as cached data
}
#pragma mark Table view methods
- (NSInteger)numberOfSectionsInTableView:(UITableView *)tableView {
    return 1;
}
// Customize the number of rows in the table view.
- (NSInteger)tableView:(UITableView *)tableView numberOfRowsInSection:(NSInteger)section {
    return [mobject count];
}
// Customize the appearance of table view cells.
- (UITableViewCell *)tableView:(UITableView *)tableView cellForRowAtIndexPath:(NSIndexPath *)indexPath {
    static NSString *CellIdentifier = @"Cell";
    UITableViewCell *cell = [tableView dequeueReusableCellWithIdentifier:CellIdentifier];
    if (cell == nil) {
        cell = [[[UITableViewCell alloc] initWithFrame:CGRectZero reuseIdentifier:CellIdentifier] autorelease];
    }
 NSString *cellValue = [mobject objectAtIndex:indexPath.row];
    cell.textLabel.text = cellValue;
    return cell;
}
- (void)tableView:(UITableView *)tableView didSelectRowAtIndexPath:(NSIndexPath *)indexPath {
   // [self.navigationController pushViewController:anotherViewController];
    // [anotherViewController release];
}
- (void)dealloc {
    [mobject release];
    [super dealloc];
}
@end
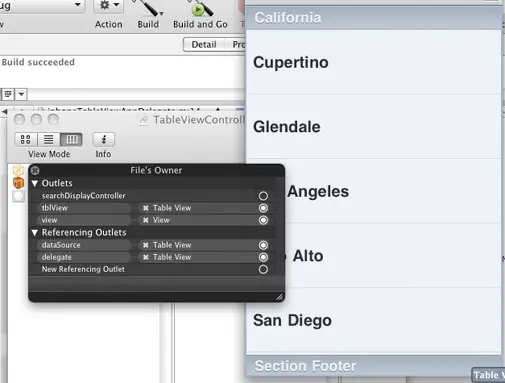
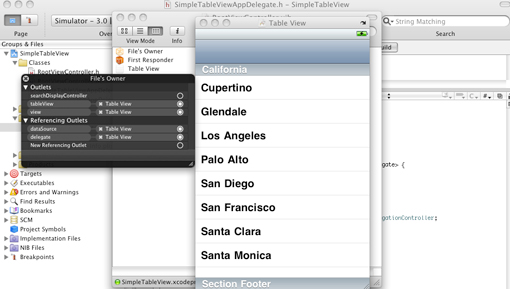
Check connection into Interface Builder:
Finally Press Build And Go Button
Click to Download Code


iphone Table View


In this tutorial will learn how to use Table View and also how to add object to table view, will add or insert the object into the Table View.

iphone Table View

In this tutorial will learn how to use Table View and also how to add object to table view, will add or insert the object into the Table View. Then will set the number of rows and the component into the Table View, when you click on the object will take you to the next view.Table views are commonly found in iPhone applications, especially productivity applications. They are versatile user-interface objects that you can adapt for different needs. A table presents a scrollable list of items (or rows) that may be divided into sections. Each row may display strings, images, or other identifiers of the represented data item. Users can select a row in a table and, as a result, be presented with another table view that lists items related to the item selected in the first table view.
Will add two ViewController to the Project and the Project is Based on Window Based Application, My project name is iphoneTableView.
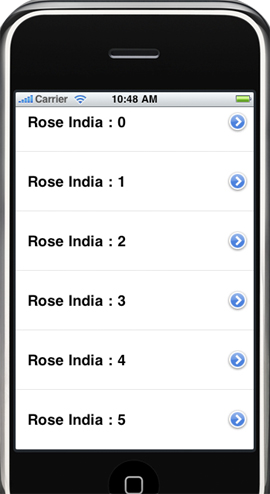
Final view will look like this:

Here will create variable for the ViewController and also the property for that and in .m file will synthesize the variable created for the ViewController and that variable will be used in DidFinishLaunching method with the nib file name so that the view will be loaded on the window when you run the program or a project
delegates.h file add this: 
@class iphoneTableViewViewController, TableViewController;
    TableViewController *mtvController;
@property (nonatomic, retain) TableViewController *mtvController;
.m file add this:
#import "TableViewController.h"
@synthesize  mtvController;
- (void)applicationDidFinishLaunching:(UIApplication *)application {
    self.mtvController = [[TableViewController alloc]initWithNibName:@"TableViewController" bundle:[NSBundle mainBundle]];
    [window addSubview:[mtvController view]];
    [window makeKeyAndVisible];
}
In TableViewController will create a class for the other ViewController which we created or added, after that will also create variable for ViewController and also for the Table View And will declare property for all of that, and in .m file will synthesize each variable and then will write the code for the Table view cell by using cel for row at index path method. Here am displaying only the one thing on each cell i.e. Rose India. After that the rows for the section in Table View. After that initializing the ViewController in didSelectRowAtIndexPath, after initializing pass the current row number to the sub view Controller and then add the view as subview to the Sub View Controller.
TableViewController.h add this:
@class SubViewController;

    IBOutlet UITableView *tblView;
    SubViewController *smvController;
@property (nonatomic, retain) UITableView *tblView;
@property (nonatomic, retain) SubViewController *smvController;
TableViewController.m add this:
#import "SubViewController.h"
@synthesize tblView, smvController;
-(UITableViewCell *)tableView:(UITableView *)tblViewcellForRowAtIndexPath:(NSIndexPath *)indexPath {
    static NSString *identifier = @" India";
    UITableViewCell *cell = [self.tblViewdequeueReusableCellWithIdentifier:identifier];
    if(cell == nil)
      cell = [[[UITableViewCell alloc] initWithFrame:CGRectZeroreuseIdentifier:identifier] autorelease];
    cell.textLabel.text = [[NSString alloc] initWithFormat:@" Rose India : %i", indexPath.row];
    return cell;
}
-(NSInteger)tableView:(UITableView *)tblView numberOfRowsInSection:(NSInteger)section {
    return 10;
}
-(void)tableView:(UITableView *)tblView didSelectRowAtIndexPath:(NSIndexPath *)indexPath {
    if(smvController == nil)
  self.smvController = [[SubViewController alloc]initWithNibName:@"SubViewController" bundle:[NSBundle mainBundle]];
    smvController.row = indexPath.row;
    [self.view addSubview:[smvController view]];
}
- (UITableViewCellAccessoryType)tableView:(UITableView *)tv accessoryTypeForRowWithIndexPath:(NSIndexPath *)indexPath {
    return UITableViewCellAccessoryDetailDisclosureButton;
}
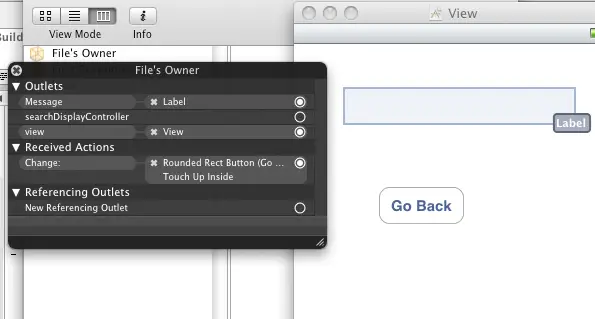
In SubViewController will take label to show the message on the next view when the cell is clicked and will take you to the next view, and variable for the viewController and also the property for that in .h file and after doing all this will synthesize it into the .m file so that it will create getter and setter file for that variable and Action for the button by which we will move to previous view , and in that action will write the method for that button so that it will take us to the previous view i.e. table view, and the label is used to show the message on the view.In action will use if statement so that when table is nil then it will move the view to the table view as button is clicked, because the action is for the button change. After all this make the connection from Interface Builder and run the program.
SubViewController.h add this:
@class TableViewController;
    IBOutlet UILabel *Message;
    NSInteger row;
IBOutlet UIButton *mbutton;
    TableViewController *tablle;
@property (nonatomic, readwrite) NSInteger row;
@property (nonatomic, retain) UILabel *Message;
@property (nonatomic, retain) TableViewController *tablle;
 -(IBAction)Change:(id)sender;
SubViewController.m add this:
#import "TableViewController.h"
@synthesize Message, row, tablle;
- (id)initWithNibName:(NSString *)nibNameOrNil bundle:(NSBundle*)nibBundleOrNil {
    if (self = [super initWithNibName:nibNameOrNil bundle:nibBundleOrNil]) {
    }
    return self;
}
- (void)viewDidLoad {
    Message.text = [NSString stringWithFormat:@"Welcome to iphone: %i",row];
}
-(IBAction)Change:(id)sender {
    if(self.tablle == nil)
      tablle = [[TableViewController alloc]initWithNibName:@"TableViewController" bundle:[NSBundle mainBundle]];
    [self.view addSubview:[tablle view]];
}
Make connection as shown below:


Finally press Build And Go Button
Download Here

Delete and add row from Table View


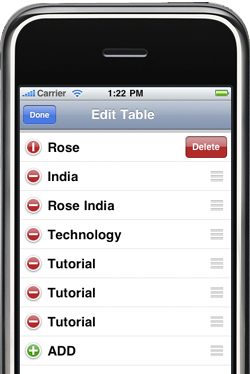
In this tutorial will learn how to delete and also how to add row into the table view, with the help of edit button on navigation bar.
Delete and add row from Table View
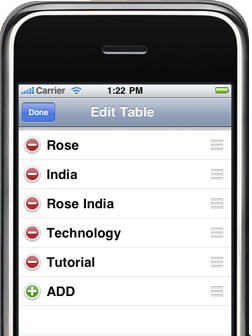
In this tutorial will learn how to delete and also how to add row into the table view, with the help of edit button on navigation bar. When we press Edit button it will show you ADD and Delete buttons on Table view.Table views are commonly found in iPhone applications, especially productivity applications. They are versatile user-interface objects that you can adapt for different needs. A table presents a scrollable list of items (or rows) that may be divided into sections. Each row may display strings, images, or other identifiers of the represented data item.
Table View Programming Guide for iPhone OS explains the concepts underlying table-view programming and shows how to create and manage table views in your own projects. It starts by giving an overview of table styles and characteristics, as well as the programmatic interfaces related to table views. It also explains in general terms how to map collections of data at various levels of a hierarchical data model to sequences of table views, and how to use certain UIKit classes to support this traversal of a data hierarchy. After giving the conceptual background, the guide discusses various aspects of table view programming, such as creating and configuring table views.

Final view will look like this:


My project name is DeleteRow and is Based on View Based Application, will add code to view controller file and then make connection into the Interface Builder.

Project created is View Based Application so we have to declare the Table view and to insert object into the Table View, we need to declare Array into DeleteRowViewController.h and also the action for the Edit function, Edit button is present on the Navigation bar and Navigation bar is add into the DeleteRowAppDelegate.m.

DeleteRowViewController.h file will look like this:
#import <UIKit/UIKit.h>
@interface DeleteRowViewController : UIViewController <UITableViewDelegate, UITableViewDataSource>
{
    IBOutlet UITableView *Table;
    NSMutableArray *arry;
}
- (IBAction) EditTable:(id)sender;
@end
After declaring the variable for the table and the action for the Edit button which is present on Navigation bar. Will add this to insert object into the Table View and setting title for the table and also the Button on Bar button is added with the title, this is written in viewDidLoad method.
Now will set number of section in table view and also the number of rows into the section, this is done by counting the array and in that will set condition for editing with if function.
After setting the number of section and rows into section in table view, will set the tablecell into table view and then if editing and the index path is not zero then the count moves to one and then will start editing.
Now the Action for Add Button and the Delete Button is declared and in that will will write method for that action. In AddButtonAction will add an object into the Table View with the array we used earlier using reloadData method and in DeleteButtonAction will delete object from Table by removeLastObject and is then reloaded the data into the Table view so the deleted object is removed.
- (IBAction)AddButtonAction:(id)sender
{
    [arry addObject:@"Tutorial "];
    [Table reloadData];
}
- (IBAction)DeleteButtonAction:(id)sender
{
    [arry removeLastObject];
    [Table reloadData];
}
In EditTable Action we are setting the method for it. If IF condition is satisfied then the title for the button is Edit and is set on the navigation bar that is on left side of the navigation Bar and if not satisfied then the title for the button is changed and written as Done.
- (IBAction) EditTable:(id)sender
{
    if(self.editing)
    {
      [super setEditing:NO animated:NO];
      [Table setEditing:NO animated:NO];
      [Table reloadData];
        [self.navigationItem.leftBarButtonItem setTitle:@"Edit"];
        [self.navigationItem.leftBarButtonItem setStyle:UIBarButtonItemStylePlain];
    }
    else
    {
      [super setEditing:YES animated:YES];
      [Table setEditing:YES animated:YES];
      [Table reloadData];
        [self.navigationItem.leftBarButtonItem setTitle:@"Done"];
        [self.navigationItem.leftBarButtonItem setStyle:UIBarButtonItemStyleDone];
    }
}
In this method the row is deleted and added if IF condition is satisfied then the object on table view which is last will be deleted, if another IF condition is satisfied then the object is add into the table View with object name as Tutorial.
- (void)tableView:(UITableView *)aTableView commitEditingStyle:(UITableViewCellEditingStyle)editingStyle
forRowAtIndexPath:(NSIndexPath *)indexPath
{
    if (editingStyle == UITableViewCellEditingStyleDelete)
    {
        [arry removeObjectAtIndex:indexPath.row];
      [Table reloadData];
    } else if (editingStyle == UITableViewCellEditingStyleInsert)
    {
        [arry insertObject:@"Tutorial" atIndex:[arry count]];
      [Table reloadData];
    }
}
DeleteRowViewController.m file will look like this:
#import "DeleteRowViewController.h"
@implementation DeleteRowViewController
- (void)viewDidLoad
{
    arry = [[NSMutableArray alloc] initWithObjects:@"Rose",@"India",@"Rose India",@"Technology",@"Tutorial",nil];
    self.title = @"Edit Table ";
    UIBarButtonItem *addButton = [[UIBarButtonItem alloc] initWithTitle:@"Edit"style:UIBarButtonItemStyleBordered target:self action:@selector(EditTable:)];
    [self.navigationItem setLeftBarButtonItem:addButton];
    [super viewDidLoad];
}
- (void)didReceiveMemoryWarning
{
    [super didReceiveMemoryWarning]; // Releases the view if it doesn't have a superview
}
- (void)dealloc
{
    [super dealloc];
}
- (NSInteger)numberOfSectionsInTableView:(UITableView *)tableView
{
    return 1;
}
- (NSInteger)tableView:(UITableView *)tableView numberOfRowsInSection:(NSInteger)section
{
    int count = [arry count];
    if(self.editing) count++;
    return count;
}
- (UITableViewCell *)tableView:(UITableView *)tableView cellForRowAtIndexPath:(NSIndexPath*)indexPath
{
    static NSString *CellIdentifier = @"Cell";
    UITableViewCell *cell = [tableView dequeueReusableCellWithIdentifier:CellIdentifier];
    if (cell == nil)
    {
        cell = [[[UITableViewCell alloc] initWithFrame:CGRectZero reuseIdentifier:CellIdentifier] autorelease];
    }
    int count = 0;
    if(self.editing && indexPath.row != 0)
      count = 1;
    NSLog([NSString stringWithFormat:@"%i,%i",indexPath.row,(indexPath.row-count)]);
     if(indexPath.row == ([arry count]) && self.editing)
    {
        cell.textLabel.text = @"ADD";
      return cell;
    }
    cell.textLabel.text = [arry objectAtIndex:indexPath.row];
    return cell;
}
- (IBAction)AddButtonAction:(id)sender
{
    [arry addObject:@"Tutorial "];
    [Table reloadData];
}
- (IBAction)DeleteButtonAction:(id)sender
{
    [arry removeLastObject];
    [Table reloadData];
}
- (IBAction) EditTable:(id)sender
{
    if(self.editing)
    {
      [super setEditing:NO animated:NO];
      [Table setEditing:NO animated:NO];
      [Table reloadData];
        [self.navigationItem.leftBarButtonItem setTitle:@"Edit"];
        [self.navigationItem.leftBarButtonItem setStyle:UIBarButtonItemStylePlain];
    }
    else
    {
      [super setEditing:YES animated:YES];
      [Table setEditing:YES animated:YES];
      [Table reloadData];
        [self.navigationItem.leftBarButtonItem setTitle:@"Done"];
        [self.navigationItem.leftBarButtonItem setStyle:UIBarButtonItemStyleDone];
    }
}
- (UITableViewCellEditingStyle)tableView:(UITableView *)aTableView editingStyleForRowAtIndexPath:(NSIndexPath *)indexPath
{
      if (self.editing == NO || !indexPath) return UITableViewCellEditingStyleNone;
      if (self.editing && indexPath.row == ([arry count]))
    {
      return UITableViewCellEditingStyleInsert;
    } else
    {
      return UITableViewCellEditingStyleDelete;
    }
    return UITableViewCellEditingStyleNone;
}
- (void)tableView:(UITableView *)aTableView commitEditingStyle:(UITableViewCellEditingStyle)editingStyle
forRowAtIndexPath:(NSIndexPath *)indexPath
{
   if (editingStyle == UITableViewCellEditingStyleDelete)
    {
        [arry removeObjectAtIndex:indexPath.row];
      [Table reloadData];
    } else if (editingStyle == UITableViewCellEditingStyleInsert)
    {
        [arry insertObject:@"Tutorial" atIndex:[arry count]];
      [Table reloadData];
    }
}
- (BOOL)tableView:(UITableView *)tableView canMoveRowAtIndexPath:(NSIndexPath *)indexPath
{
    return YES;
}
- (void)tableView:(UITableView *)tableView moveRowAtIndexPath:(NSIndexPath *)fromIndexPath
      toIndexPath:(NSIndexPath *)toIndexPath
{
    NSString *item = [[arry objectAtIndex:fromIndexPath.row] retain];
    [arry removeObject:item];
    [arry insertObject:item atIndex:toIndexPath.row];
    [item release];
}
@end
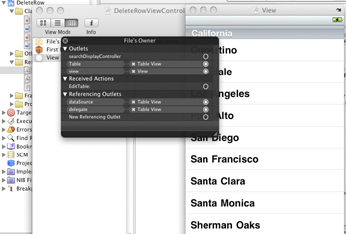
Make connection as shown
:
Finally Press Build And Go

Followers